FilmoraPro behaviors and appearance can be adjusted to suit your preference. To open FilmoraPro’s Options window, choose ‘Options…’ in the File menu (On Mac, choose ‘Preferences…’ under Wondershare FilmoraPro.) The Options settings are divided into multiple tabs, located down the left side of the window.
General
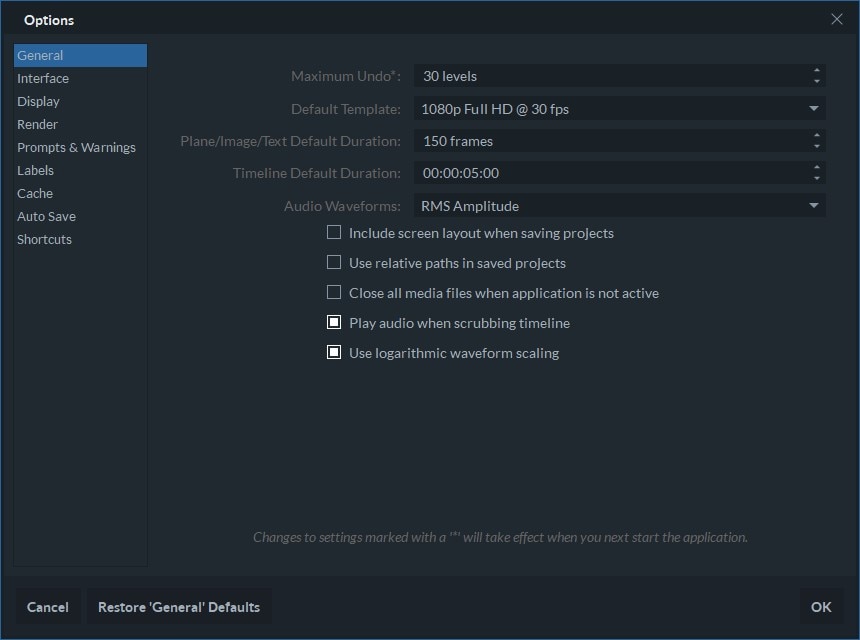
The General tab:
-
Maximum Undo – FilmoraPro logs your actions in case you need to undo a change you made, or several changes. A larger number of entries on this list may slow down your computer.
-
Default Template – New projects use this image resolution and frame rate in the editor timeline. These settings can be changed for each specific project in the Project Settings, accessed from the Editor panel. It is recommended that you work with project settings that match your desired export resolution and frame rate.
-
Plane/Image/Text Default Duration – Determines the default duration of media assets on the timeline. The default setting is 150 frames, but this value can be changed by either typing in a new value or clicking on the up or down icons located on the right side of this property. This value cannot exceed 1000 frames.
-
Timeline Default Duration – New projects start with this duration in the timeline. Your exported movie will be the actual duration of your project, or the in-to-out range that you set.
-
Audio Waveforms – Sets the waveform type displayed for audio clips in the editor timeline. You can find more information about this property in the Working with Audio section.
-
Include Screen Layout When Saving Projects – Enabling this option saves your UI layout with the project file. When loading a project, the saved layout becomes your workspace.
-
Use Relative Paths in Saved Projects –All projects can contain either absolute or relative references to media file paths. When this option is enabled, all media files in the project are referenced based on the project file location. This is useful for transferring projects to another computer.
-
Close All Media Files When Application is Not Active – Once you import a media file into FilmoraPro, all changes you make to that file outside the software will not be visible in the software unless this option is switched on. If you activate this property, the files in the Media Panel will be updated each time you alter the original file.
-
Play Audio When Scrubbing Timeline – Dragging the playhead along the timeline is called scrubbing. If this option is enabled you will hear the audio while moving the playhead.
-
Use Logarithmic Waveform Scaling – This setting enhances the depiction of logarithmic waveforms in the dB scale.
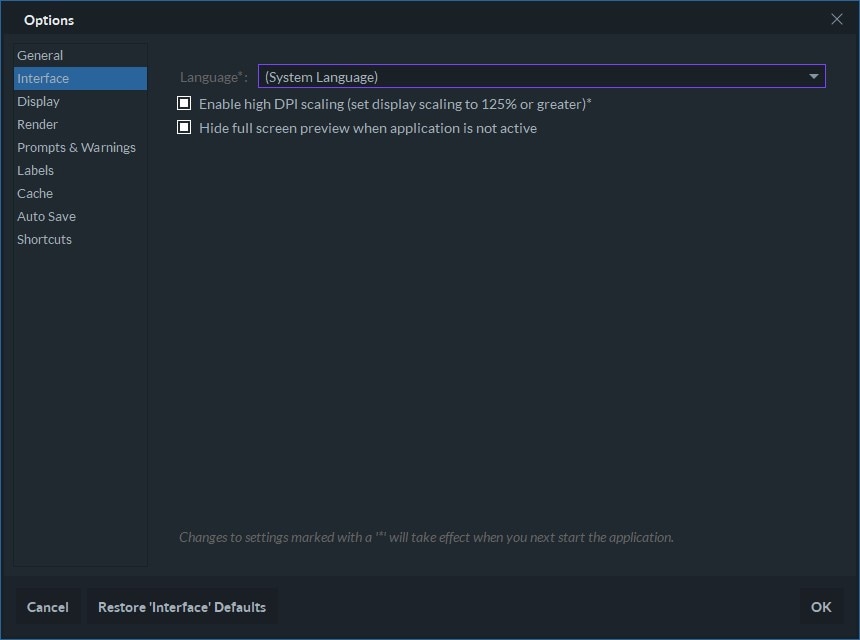
Interface
-
Language – Set the language of the interface. If (System Language) is selected, the interface will use the same language as the computer operating system, if supported.
-
Enable High DPI Scaling (Set Display Scaling to 125% or Greater) – This determines whether or not desktop scaling is applied to FilmoraPro’s interface. The property is enabled by default and, if you want to switch it off, you must restart the software after unchecking the Enable High DPI Scaling checkbox. This option is only available on Windows OS.
-
Use the native menu bar – Mac only. This places FilmoraPro menu items on the Mac menu bar. Switching this option off moves the menu into the software interface.
-
Hide Full Screen Preview When Application is Not Active – You can preview your footage in full-screen mode on a second display. If you activate this option that full-screen preview will be hidden when FilmoraPro isn’t active.
Display
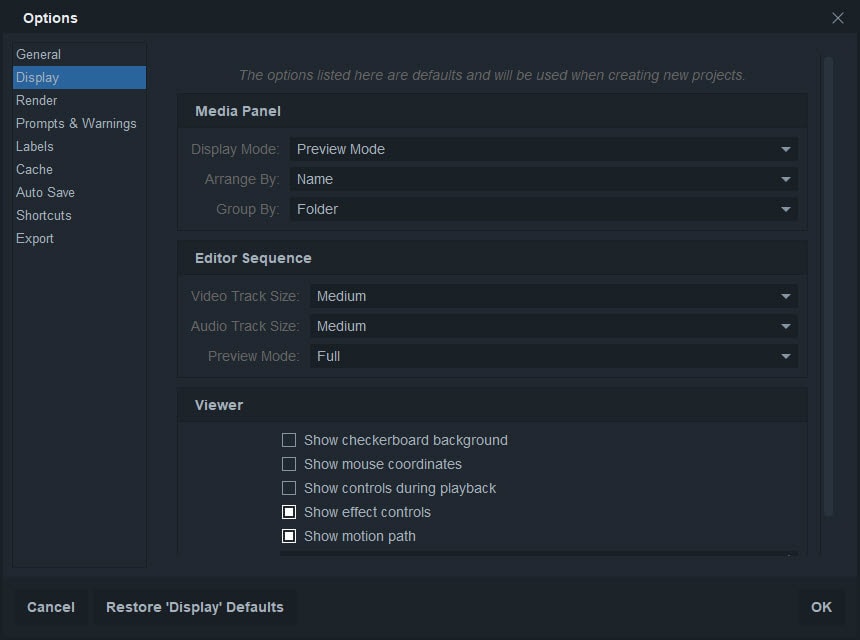
The Display tab in the Options window provides interface settings.
Media Panel
-
Display Mode – Control how media files are shown in the Media Panel by choosing List Mode or Preview Mode. Preview Mode shows thumbnails of imported media files, while List Mode only displays the names of the imported files.
-
Arrange By: Determine how assets are sorted in the Media Panel. Assets can be arranged alphabetically by selecting the Name option from the Arrange By drop-down menu, or you can choose Type to group different types of files together.
-
Group By: Group files using the Folder or Media options.
Editor Sequence
-
Video Track Size – This property offers four different video track sizes: Small, Medium, Large, and Extra Large.
-
Audio Track Size – This property offers four different video track sizes: Small, Medium, Large, and Extra Large.
-
Preview Mode – Change the way media files are displayed on the timeline. The Full option shows thumbnails throughout a video clip, while the Start/End option only displays thumbnails at the beginning and end of a clip. If you don't want to see thumbnails in the timeline, select None.
Viewer
-
Show Checkerboard Background – Indicates the transparent areas within the Viewer. This property is enabled by default.
-
Show Mouse Coordinates – Displays mouse coordinates in the Viewer Panel.
-
Show Effect Control - See options for adjusting the settings of each effect you apply. This property is enabled by default.
-
Show Motion Path – Shows the movement of layers across multiple keyframes.
-
Motion Path – Change the number of keyframes that are displayed in the motion path. The default number of keyframes is set at 100, and the maximum number is 1000.
Render
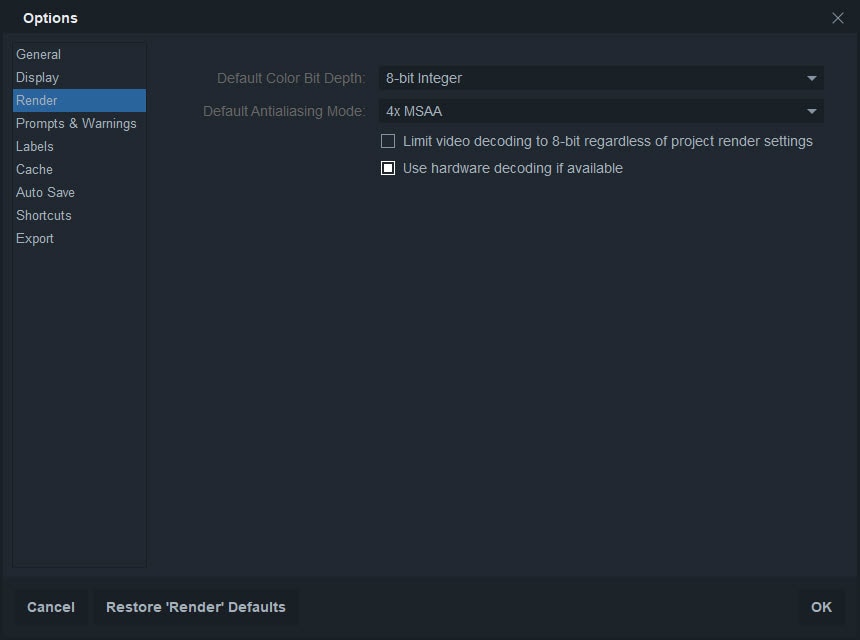
The Render tab in the Options window allows you to control how FilmoraPro renders your projects. Each of the options in the Render tab can be changed in the Project Settings window after a project is created.
-
Default Color Bit Depth – Lowering bit depth decreases the rendering time, but it also reduces the fidelity of images. Higher bit depths generate high fidelity images, but they also increase the rendering time.
-
Default Antialiasing Mode – Choose between 4XMSAA and 8XMSAA antialiasing modes. Choosing 8XMSAA will create more detailed edges on images you place on the timeline, but it may increase rendering time. The 4XMSAA mode doesn't provide the same level of detail around edges, but it reduces rendering time.
-
Limit video decoding to 8-bit regardless of project render settings – Limiting the video decoding to 8-bit will increase the rendering speed. Leaving this checkbox unmarked will render your media files in accordance with the project render settings.
-
Use hardware decoding if available: Enables GPU acceleration to help you render more efficiently. Note that mobile-class GPU, or older graphics chips, may not be as powerful as your CPU, so performance is not always better when this setting is activated.
Prompts and Warnings
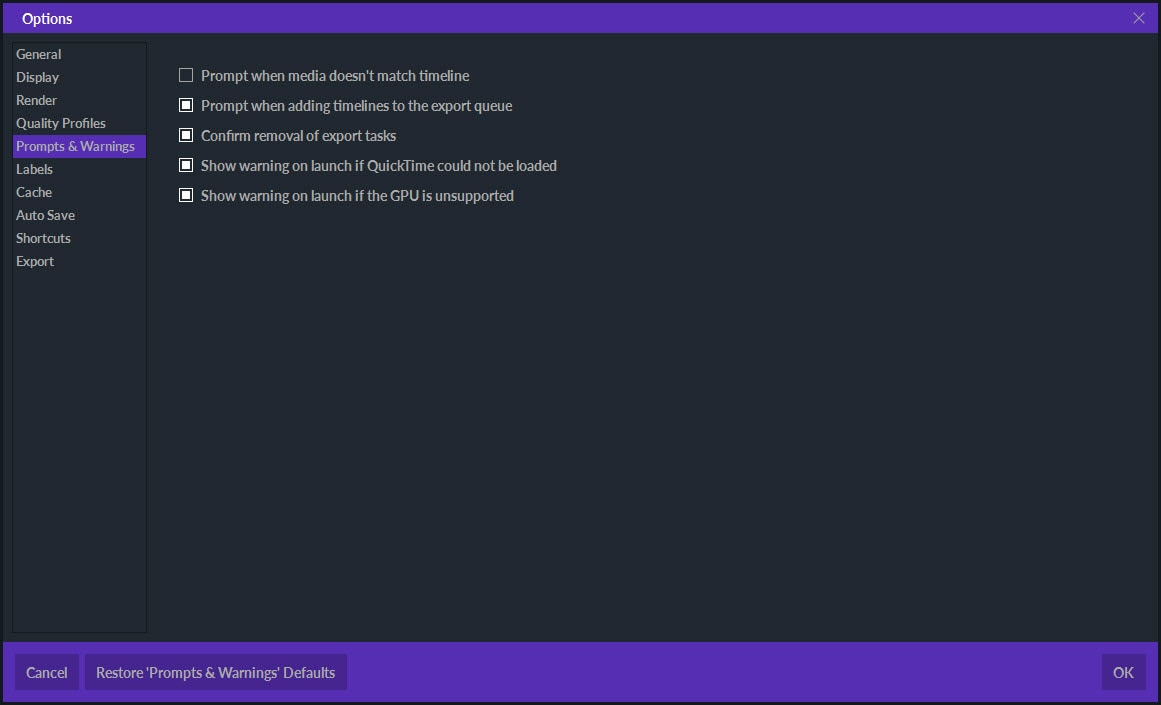
Choose which warnings and prompts you want to see while editing.
-
Prompt when media doesn't match timeline – The first clip you add to the timeline in a new project may not match the project settings. This option informs you that the project settings are going to be changed to match the properties of the clip you placed on the timeline. If you disable this prompt then this change will still happen without notification.
-
Prompt when adding timelines to the export queue – After you add a timeline to the Export queue, you'll see a dialogue box asking you if you want to export the project or resume editing.
-
Confirm removal of export tasks: You'll see this when you remove a task from the export queue. It will ask you to conform that you want to remove the tasks.
-
Show warning on launch if QuickTime could not be loaded: You may need QuickTime if you are working with videos shot with an iPhone. Keep this checked if you want to be warned that QuickTime is not loading, or uncheck it if you do not need QuickTime. This option is only available for Windows.
-
Show warning on launch if the GPU is unsupported – A warning will pop up on the screen after you attempt to launch FilmoraPro if your computer doesn't meet the technical hardware requirements.
-
Show warning on launch if the GPU driver is unsupported or out of date – A warning will pop up on the screen after you attempt to launch FilmoraPro if your computer doesn't meet the technical software requirements.
Labels
You can label different clips or types of media with different colors, and you can manage those colors in this menu.
-
Defaults: There are three dropdown menus in this section you can use to change the default colors of 3 types of assets – Media, Images, and Planes – in the timeline.
-
Labels: There are 16 potential color labels listed here. You can change the names by clicking on them and typing and if you click on a color a window will pop up allowing you to change it.
Cache
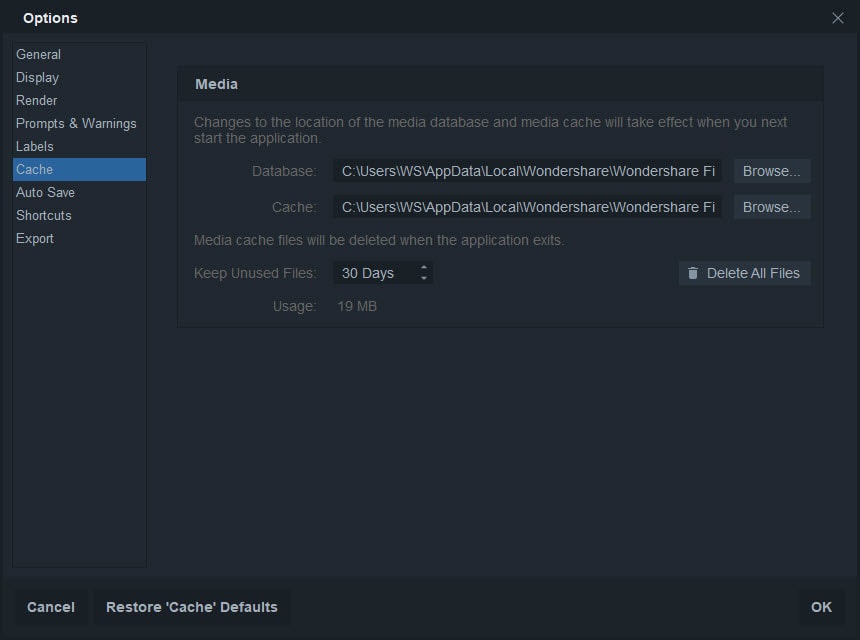
Your Cache is where you store data with the aim of reducing the amount of time necessary to provide that data in the future. It improves the software's performance because it enables it to respond faster to your requests.
Media
If you encounter space shortage issues, you can change the location where the cache database and cache files are stored.
-
Database – Lets you browse your computer's hard drive and set a new storage location for the cache database.
-
Cache – Lets you browse your computer's hard drive and set a new storage location for cache files.
-
Keep Unused Files – Change the number of days cache files will be stored before they are deleted.
-
Delete All Files – Removes all cache files, regardless of how new or old they are.
You must restart the software in order for changes you made in the Cache tab to take effect.
Auto Save
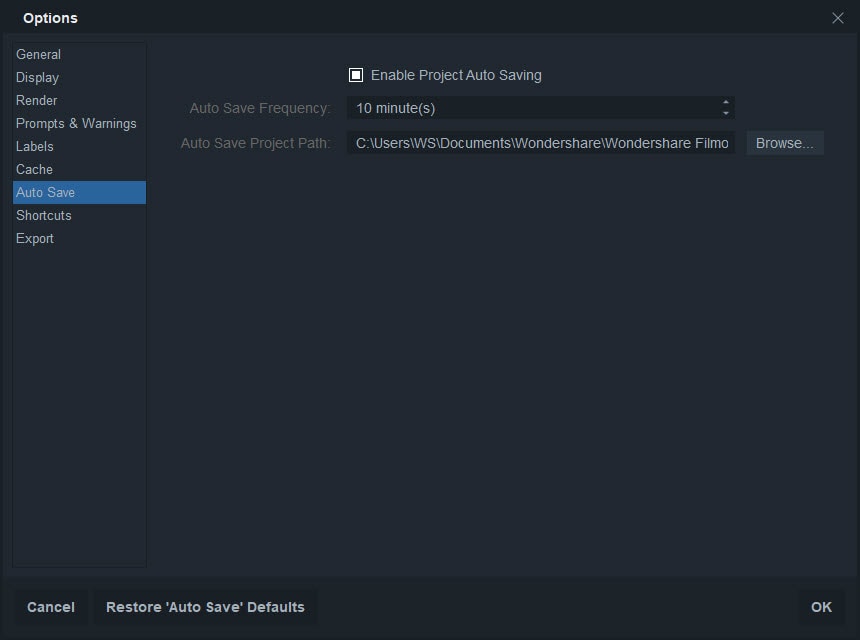
Auto Save protects you from losing progress if FilmoraPro shuts down due to a power failure or other unforeseen circumstances. The Auto Save option is enabled by default, but you can toggle it off from the Auto Save tab in the Options window.
-
Enable Project Auto Saving – Toggle Auto Save on and off.
-
Auto Save Frequency – Choose how often your projects will be auto-saved. The time between two auto saves can't be longer than thirty minutes.
-
Auto Save Project Path – Choose the location on your hard drive where all auto saves of your projects will be stored. Your main project file will not be saved at the same destination on your computer's hard drive, which is the reason why auto saves don't interfere with it. A new project file is created after each auto save and after the project is saved manually all auto-save files created between the two manual saves will be deleted. The autosave frequency will reset after a project is saved manually.
If for whatever reason FilmoraPro doesn't shut down properly, the next time you launch the software you'll be asked if you want to recover the last auto save.
Shortcuts

A lot of important tools and features in FilmoraPro can be activated with keyboard shortcuts, or hotkeys. Nearly all shortcut commands are already set by default, but you can customize them. Click on the shortcut you’d like to change and press the new key combination.
The search bar that is located at the top of the Shortcuts tab can be used to locate a particular shortcut faster. As you type, a list of shortcuts that contain the letters you inserted into the search bar will appear on the screen. Visit the Keyboard Shortcuts page to find the full list of shortcuts in FilmoraPro.
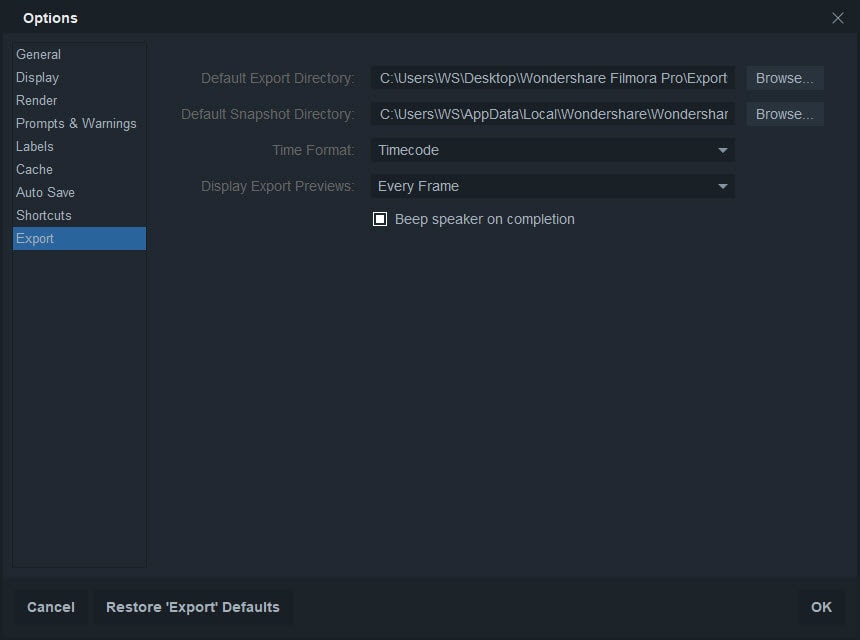
Export
-
Default Export Directory – Set the default location on your hard drive where exported videos will be saved.
-
Default Snapshot Directory –Set the default location where queued export projects are saved. These temporary files are deleted automatically when tasks are removed from the export queue.
-
Time Format – Choose the format used to display the Elapsed Time and Remaining Time during the Export process.
-
Natural – Shows time in a format like '5 minutes' or '30 seconds'.
-
Timecode – This time format shows hours, minutes, seconds, and frames.
-
Seconds – Displays time in seconds only.
-
Beep Speaker on Completion – You will hear an audio notification after the export process is completed.

