-
-
-
-
- Still have questions? Submit a ticket to our support team. Contact Us Or Call Us
-
-
-


The FilmoraPro's Editor Panel offers a set of tools that enable you to perform basic compositing tasks such as applying static visual effects, creating a picture-in-picture effect or fading in and out of video clips.
Videos placed on several different tracks can be combined within the same frame. The video clip you place on the lowest track will be used as a background, and clips on the upper tracks will be rendered on top of the clip on the track at the bottom.
Please visit the Video and Audio Tracks page to learn more about using tracks in FilmoraPro.
After you've created several video tracks, you can proceed to position the video clips one above the other. If all videos have the same resolution, you will only be able to see the video clip on the top, which is the reason why you will have to use the Transform option to reduce the clip's size in the Viewer Panel. Afterward, you can select a blend mode to alter the way the clips are merged together or apply visual effects.
Video clips you place on the timeline will be displayed in the Viewer, where you can transform them, which means that you can change their scale, position and rotation properties. These options enable you to create a picture-in-picture effect that is often used in news-style broadcasts or presentations.
Before you can transform a clip, you must first make sure that it is selected properly in the timeline. You can then proceed to change the scale, rotation or position values from the Controls or Viewer panels.
The Viewer panel displays a transform widget.
![]()
The green vertical and blue horizontal lines will be displayed over the overlaying clip suggesting the directions in which the clip can be moved, and you just have to drag them to move a clip in either direction. You can also click anywhere else on the top layer clip to change its position within the Viewer. Dragging a Blue Square will enable you to rotate the clip.
Each of the four corners of a clip displayed in the Viewer contains handles that can be used to resize a clip. If you press the Shift button while you are dragging a handle the aspect ratio of the clip will be maintained while holding the Alt (OPT on Mac) and dragging one of the handles will allow you to rotate the clip.
The Controls Panel offers properties that enable users to transform videos with more precision.
![]()
Each of the properties in the Transform menu can be adjusted in two different ways. You can either click on the property's existing numerical value and type in a new one or you can increase or decrease a value by dragging it left or right.
Right-clicking on a clip on the timeline and selecting the Transform option will enable you to perform basic transform actions such as Fit to Frame or Center in Frame.
All video clips have anchor points, that represent points around which a clip rotates. By default, the anchor point is set to the center of a video clip, which in most cases is the best position of an anchor point. However, if you are working with a simple rectangular plane and you'd like to rotate it around one of its corners, you can set a new anchor point at the desired location by altering the values of the Anchor Point property in the Controls Panel. Changing the anchor point of a video clip doesn't affect the rotation process.
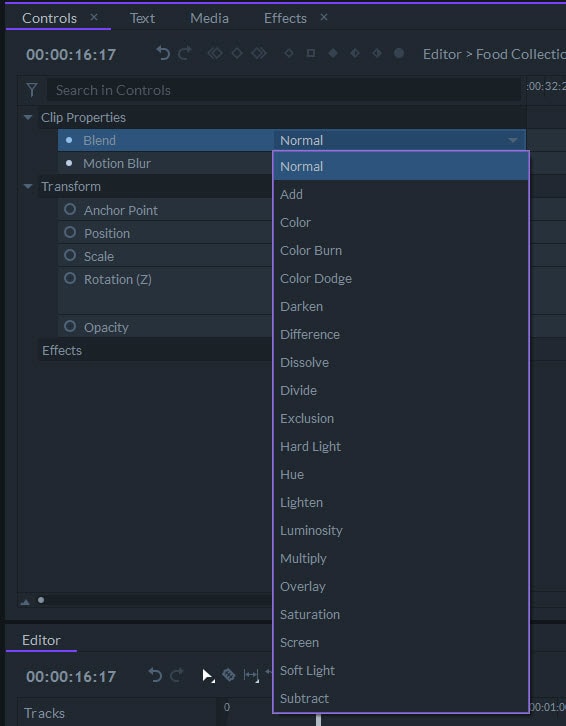
Under the default settings, overlaying clips obscure the clips below them and render parts of the frame they cover invisible to the viewer. Blend Modes offer a variety of different presets that mix the two clips together. They can be accessed by collapsing the Clip Properties menu and clicking on the Blend option or by right-clicking on a clip and selecting one of the modes offered in the Blend submenu.
Each of the available modes combines the pixels of two clips in a unique way. Prior to making blend mode calculations, the color values are mapped from the RGB range of 0 - 255 to a range of 0.0 - 1.0 where 0.0 is pure black and 1.0 is pure white. Blend modes are divided into several categories, based on the general effect they have on the clips to which they are applied.
You can change the opacity value at different points of a video clip, which enables you to make a clip semi-transparent or create a fade in and fade out effects manually. The opacity of a video clip can be changed from the Controls Panel or directly from the timeline since all clips have the opacity bar that can be dragged up or down.
However, moving the opacity bar up or down will reduce or increase the opacity of the entire clip. Setting different opacity values over time requires you to add keyframes to the opacity bar, by holding the Ctrl button and clicking on the desired location on the bar. Different opacity values can be assigned to keyframes by dragging them up or down, and the software will automatically adjust the opacity values for frames between two keyframes. Dragging a keyframe horizontally will change its timing, and holding the Shift button while dragging a keyframe will constrain its movement to the horizontal time axis.
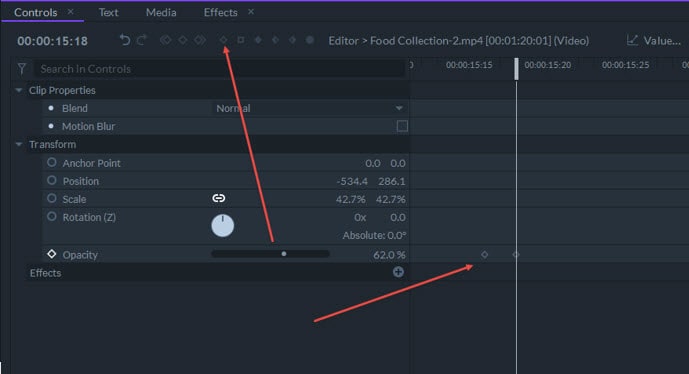
The opacity of a clip over time can also be adjusted from the Controls Panel, by using the Opacity slider and adding keyframes from the panel's toolbar.
If you would like to learn more about how you can use keyframes in FilmoraPro, please visit the Keyframes page of this manual.
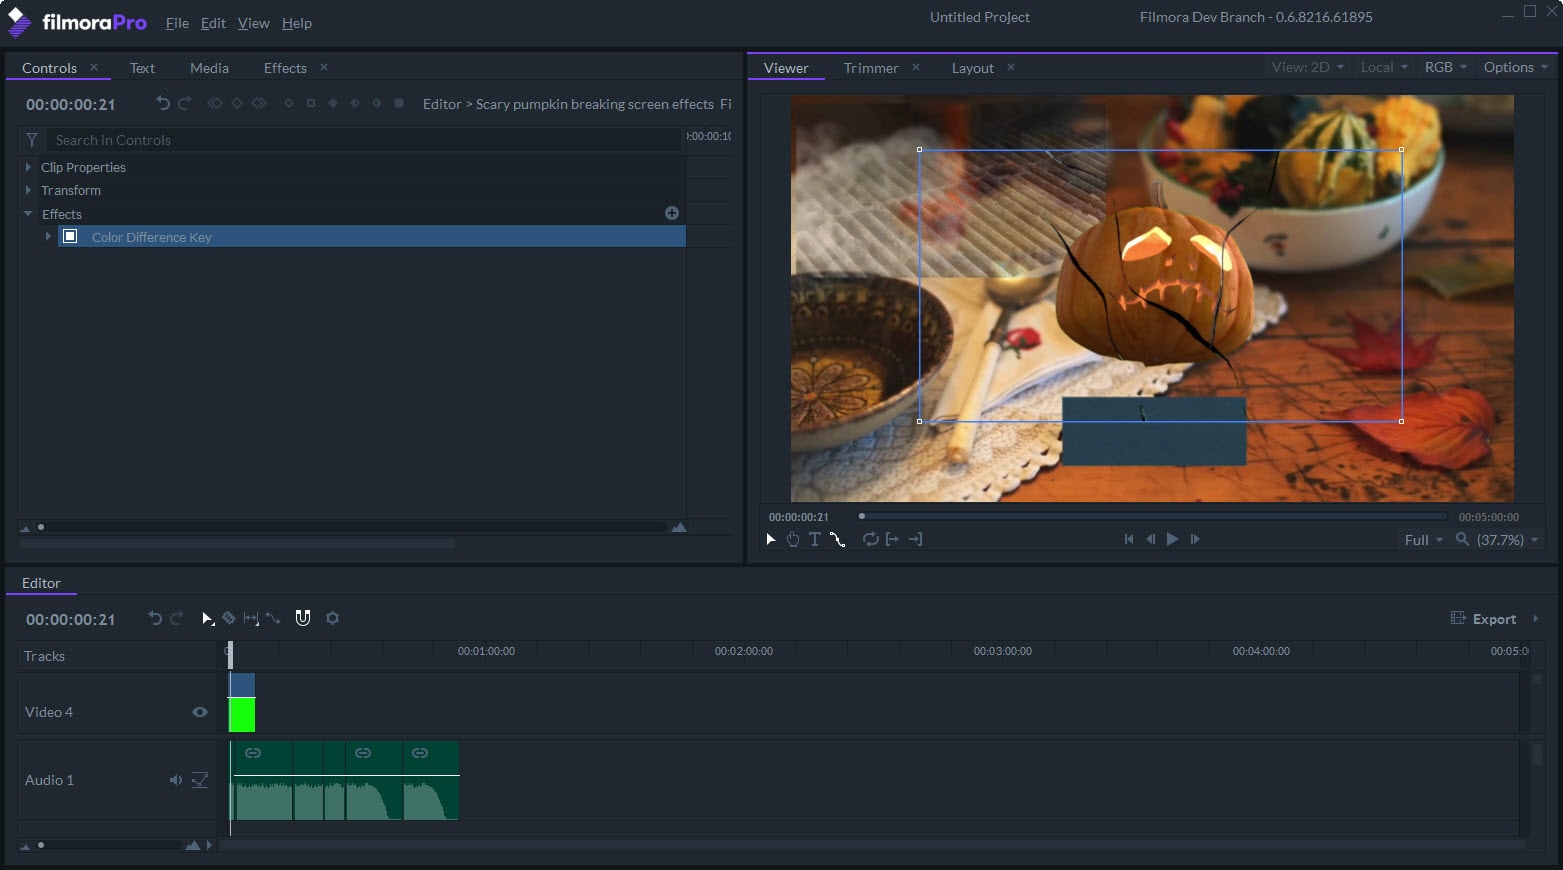
FilmoraPro offers a rich selection of compositing effects that can be accessed from a Keying folder in the Effects Panel. A lot of these effects can be applied directly to the video clips you place on the timeline.
The Color Difference Key effect offers a simple and effective way to remove green screen backgrounds from video clips. If you would like to apply it to a video clip in your project you can just drag the effect from the Effects Panel and drop it onto a clip that contains a green screen footage. The effect's properties can be fine-tuned in the Controls Panel.
More information about FilmoraPro's keying tools is available at the Keying chapter of this manual.