-
-
-
-
- Still have questions? Submit a ticket to our support team. Contact Us Or Call Us
-
-
-


The Color Grading folder contains a number of visual effects that can be effectively used to enhance the colors in all videos you import into the software. Completing basic video editing actions such as trimming and cutting the video clips or arranging their order on the timeline before you start grading the colors in a video is advised because it will enable you to match the color tones across the entire final cut of the video.

This effect generates loops from the color pallet and it offers a number of properties that enable you to control which color channel is going to be used as a source for mapping the color cycle or to blend the effect with the image.

Overcast shots can easily be turned into night scenes regardless of the actual time of the day when they were recorded. The footage to which you apply this effect shouldn’t be too colorful or have a direct source of light in the shot because the results might not have the illusion of realism.

The effect generates a gradient that can be controlled through the Horizont option, while the colors can be manipulated using the near and far features.
Horizon: Used for determining where in the picture a split between near and far areas is going to be located.
Near
Far


Applying this effect to a video clip will help you quickly set the new Hue values for a particular layer. The Hue Colorize effect offers a number of preset values, but users can also customize the Hue Strength, Saturation and Lightness properties in order to achieve the maximum visual effect.

Offers a number of preset hue values, such as 310 Magenta or 240 Blue, that automatically alter the hue values of a clip to which this effect was applied. The Hue Shift rotation wheel enables you to go through the entire color spectrum while customizing the hue values in a video clip. The Saturation and Lightness can be used to fine-tune the intensity and brightness of the hues.

Generates an image negative by inverting the colors in a video clip to which this effect was applied. The Invert effect doesn’t contain any additional properties, which means that you have to adjust the brightness or saturation of a clip after you apply the effect.

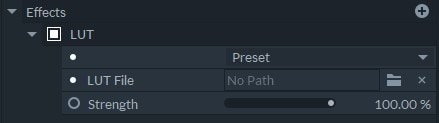
LUT files allow you to change the colors of a video, to simulate the looks of Hollywood movies, specific film stocks, or processing techniques. Choose from the included LUT presets, or load an industry-standard .cube LUT file. You can adjust the strength of the LUT effect to mix with the original colors.

Recreates a technique used in the early days of the color cinema, that enhances and enriches the red, green and blue colors. The effect offers a number of presets such as Strong Blue or Strong Yellow, while still offering the option to boost the strength of green, blue or red colors manually. However, these options should be used in moderation, as high intensity of any of the colors can shatter the video’s illusion of realism.


When applied to a video clip this effect will generate the simulation of the two color strip process. The filter properties mimic the color a camera sensor is sensitive to, and reduce the footage to just two colors, while the dye settings repaint the footage and convert it back to three color version.

The Halloween or Icy presets offer default values for each of the effect’s settings, which enables the FilmoraPro’s users to try out different combinations of colors on video clips they use in their projects.
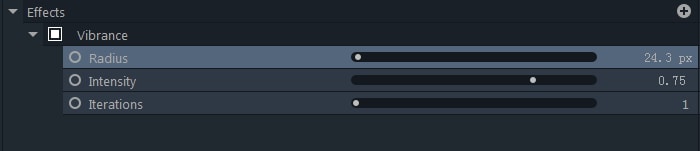
Makes the colors in a video clip appear more vibrant and puts emphasis on the edge details by increasing the local contrast of the image.

The Vignette effect adds a usually black overlay to edges a video clip, but the color of a vignette can be easily changed in the effect’s properties. What’s more, you can customize the softness, curvature as well as all other setting the effect offers. Presets such as HD Vintage or HD Soft can be used to achieve better visual results.
Instead of applying an overlay, like the Vignette effect, the Vignette Exposure effect enables you to create vignettes by manipulating a video’s exposure. Heavily Overexposed or Moderate, among a number of other presets can be utilized in a wide range of video editing settings, while the effect also offers the option to adjust each of its presets manually. Producing the halo effect or reducing effects of unwanted vignetting in the source footage are only a few out of many contexts in which the Vignette Exposure effect can be used.
