-
-
-
-
- Still have questions? Submit a ticket to our support team. Contact Us Or Call Us
-
-
-


FilmoraPro enables you to add multiple audio tracks to the timeline, which can be useful if you want to create a soundtrack for your video that contains dialogues, sound effects, and music. More information about using tracks in FilmoraPro is available at the Audio and Video tracks page.
The Audio Mixer Panel has a traditional interface that is perfectly optimized for the adjustment of audio settings that ensure that all sounds can be heard properly and without clipping.
Audio Clipping or Peaking occurs when the audio output extends beyond the range of the playback. Clipping is depicted with red color on audio meters and it may cause digital distortion that can impact the quality of your soundtrack significantly.
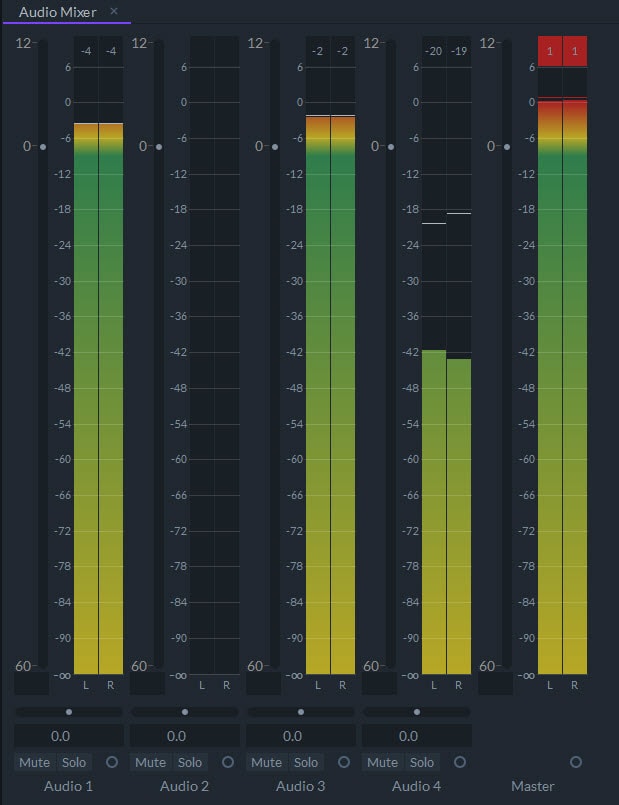
Audio Peaks are represented as green bars in the Audio Mixer Panel during playback or while you're dragging the playhead. Each audio channel is displayed as a separate bar. Thin white lines or peak indicators appear when the sound on a channel reaches its peak, and they can help you detect any unwanted clipping.
The peak volume readout turns red if audio clipping occurs on a channel, so you can easily spot the parts in the mix that are too loud and that may cause sound distortions. Lowering the master volume of the tracks in the part of the mix that exceeds the range of the playback may help you avoid clipping. After you readjust the audio settings, the clipped peaks will remain red until you move the playhead or start a new playback.
The peak meter is not directly proportional to the volume as it represents the amplitude of the sound. In most cases, higher amplitude results in a louder sound, but other factors like frequency can also impact the level of perceived loudness.
This panel is not a part of Filmora's application window by default, but it can be switched on or off from the Panels submenu, that is located in the View menu. It shows you the audio levels of the left and right channels and enables you to easily detect the portions of the audio tracks on which the audio levels have to be reduced in order to avoid clipping.
Audio clipping occurs when the output extends beyond the playback range and it can distort the sound, which is why it is advisable to do everything in your power to avoid it.
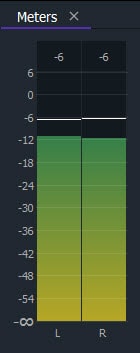
During playback or while dragging the playhead across the timeline, the peak levels on the left and right channels are going to be depicted by a green bar. The left and right channels are displayed separately. A thin white line will appear above the bars, indicating the peak volumes on each channel. The peak values change during the playback which makes it easy to identify parts that go beyond the playback range.
When clipping occurs, the highest portion of the bar on the affected channel will turn red, informing you that the volume can be too high. In this manner, you can identify areas of the mix that are too loud and that may cause sound distortion during playback. Reducing the master volume can help you avoid clipping. The clipped peaks will remain red until you move the playhead or start the playback.
The peak meter is not directly proportional to the volume as it represents the amplitude of the sound. In most cases, higher amplitude results in a louder sound, but other factors like frequency can also impact the level of perceived loudness.
The meter scale is a full decibel scale (dBFS), on which the 0 dBFS is the maximum audio level before clipping occurs. The Peak Bars are depicted using a specter of colors that range from yellows for low audio volumes such as -90 dBFS to reds for high audio volumes like -3dBFS or 0 dBFS. When the audio level is below -6 dBFS the Peak Bars will be green indicating that the current audio level is safe. If the audio level raises above -6 dBFS the Peak Bars will once more turn yellow indicating that the levels are approaching the acceptable maximum. The color of the Peak Bars will be red for all values higher than 0 dBFS, meaning that the signal is going to be clipped. Adjusting the audio level for the channel that exceeded the acceptable audio level is the best way to prevent clipping from happening.
The maximum value on the Meter Scale is +6 dBFS so you can see how far beyond 0 dBFS the audio is peaking. For instance, if the audio is peaking for +3 dBFS, you have to reduce the audio level for 3 decibels to get it back to the acceptable range below 0 dBFS.
Right-clicking on the Audio Meter panel will enable you to activate the Hold Peaks option that prevents white line peak indicators from lowering during playback. As a result, at the end of the playback, you'll be able to see the readout of the maximum peak level for the particular portion of the timeline.
The audio meters use dynamic peaks that update every two seconds by default. If during that time the peak level changes, the white line indicators will fall down or move up to the current peak level.
Both Editor and Trimmer panels display waveforms of audio files. The visual representation of the entire audio file makes positioning video clips based on audio content easier.
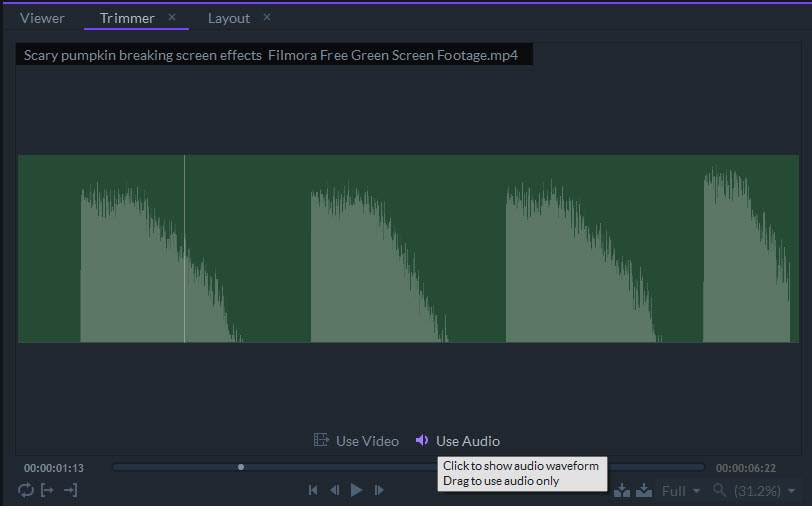
If the size of an audio track on the timeline is set to Medium, Large or Extra Large waveforms of audio files will be displayed by default, while if the Small size of the audio track is selected you will not see the visual representation of audio files you add to the audio tracks on the timeline. Please visit the Audio and Video Tracks page of this manual to learn more about optimizing audio tracks in FilmoraPro.
The volume of a clip can change as the clip progresses, which enables you to build suspense using only the sound or to slowly introduce a song. The volume of an audio file can be adjusted from the Controls panel or directly from the timeline. Each audio clip you add to the timeline will have a volume bar that can be dragged up or down to change the audio's volume. However, dragging the volume bar will change the volume of the entire clip which can limit your editing options. Adding keyframes, by holding the Ctrl (CMD on Mac) key and clicking on the volume bar will enable you to change the volume on different segments of the audio clip.
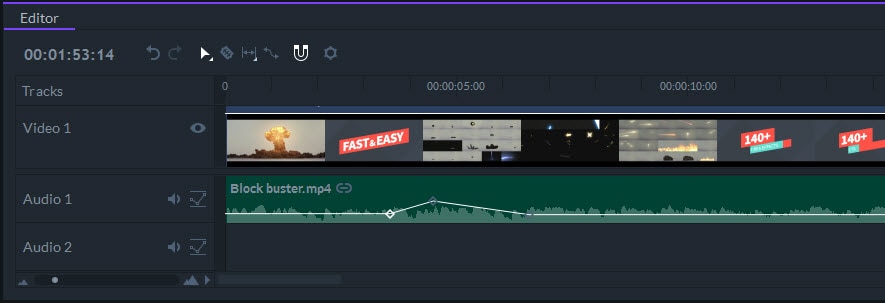
Alternatively, you can enable or disable the keyframe option in Controls Panel by clicking on the keyframe button located on the left side of the Volume Level property.
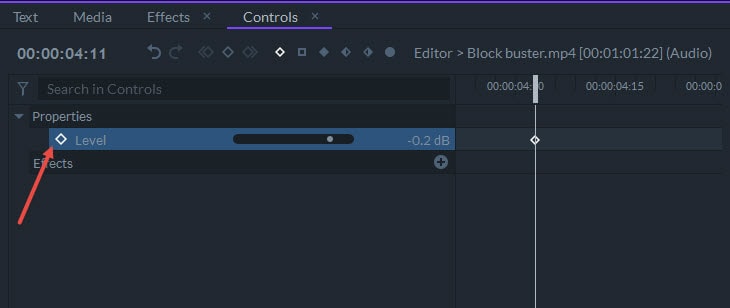
After selecting the Audio property in the Controls panel you can use the keyframe navigation buttons at the top of the timeline to jump between keyframes.
The Audio folder in the Effects panel contains a number of audio effects such as Compressor or Audio Reverse that can be used to further polish the soundtrack of your video. Simply drag the effect you want to use and drop it onto a clip to apply it. Once you've added the effect to an audio clip, you can adjust its properties in the Controls Panel.
Recording audio and video separately is a common practice among the industry professionals. FilmoraPro offers a quick way to sync video and audio files that were recorded separately by selecting the Sync Video and Audio option in the Media Panel. Visit the Sync Video and Audio page to learn more about this feature.