The Layout Panel lets you choose the preview settings for all of the video clips you place on the timeline. The available controls depend on the selection.
Orientation
To change the orientation of a selected video clip, find the orientation controls in the top left corner of the panel and click on the appropriate icon to flip or rotate your clip.

-
Mirror Vertical – Flip the image along the vertical axis. You can change the orientation of multiple video clips by selecting them all and clicking on the Mirror Vertical icon.
-
Mirror Horizontal – Flip the image along the horizontal axis. You can change the orientation of multiple video clips by selecting them all and clicking on the Mirror Horizontal icon.
-
Rotate Counterclockwise – The selected clip will be rotated 90-degrees to the left. Clicking on the Rotate Counterclockwise icon several times will rotate the clip 90-degrees left each time you click on the icon.
-
Rotate Clockwise – The video clip will be rotated to the right by 90-degress. Clicking on the Rotate Clockwise icon several times will rotate the clip 90-degrees right each time you click on the icon. .
Anchor Points
Anchor point selection determines the center point when scaling, and helps to guide positioning. Note that the anchor point set on this panel does not affect the transform controls in the Controls panel.
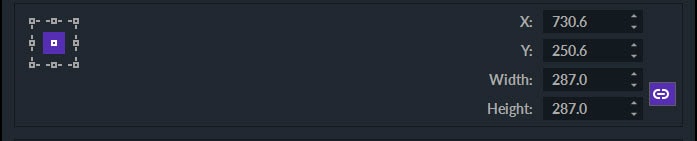
The anchor point settings are located directly below the Mirror and Rotate icons. You’ll see a rectangle with small squares at its edges, corners, and center. The center square is the default anchor point setting. Click on any square to set it as the anchor point. When multiple layers are selected, the anchor will affect the entire selection.
The X and Y boxes will move the selection along the horizontal and vertical axis precisely. The Width and Height values will scale the selection. In this Layout panel, these scale controls display size in pixels, while the Transform controls for Scale use a percentage of the original size. Scaling by default links width and height together, but they can be unlinked by clicking on the Link icon.
Alignment
The lower section of the Layout Panel has alignment and distribution options that let you reposition selected assets.
Align to Timeline

-
Align Horizontal Left – Positions the left side of a clip at the left edge of the output frame.
-
Align Horizontal Center – Centers the clip horizontally within the frame.
-
Align Horizontal Right – Positions the right side of a video at the right edge of the frame.
-
Align Vertical Top – Aligns the upper edge of the video clip to the top edge of the frame.
-
Align Vertical Center - Centers the selected video clip vertically within the frame.
-
Align Vertical Bottom – Places the bottom edge of a video at the bottom edge of the frame.
The Align to Timeline option moves the selection to the top, center, or bottom of the output frame. Align to Selection moves the selected clips based on an invisible bounding box containing the selection.
Align to: Selection
-
Align Horizontal Left – Positions the left side of all selected clips at the left edge of the layer that is farthest to the left.
-
Align Horizontal Center – Centers the selected clips between the left and right edges of the selection.
-
Align Horizontal Right – Positions the right sides of all selected clips at the right edge of the layer that is farthest to the right.
-
Align Top – Aligns the top edges of all selected clips with the top edge of the selection.
-
Align Vertical Center - Centers all selected clips between the top and bottom edges of the selection.
-
Align Horizontal Bottom – Places the bottom edges of all selected clips at the bottom edge of the selection.
Distribute Objects
If you’re working on a project with multiple videos or images within a single frame, the Distribute Objects feature can help you to arrange them quickly. Select three or more clips to enable this feature.

-
Distribute Top – Creates even separation between clips using the top pixels of each clip. The highest and the lowest positioned clips will remain in their places, while all other clips will be moved vertically.
-
Distribute Vertically – Utilizes the centrally positioned pixels to space the selected clips evenly within the Viewer. The highest and the lowest positioned clips will remain in their places, while all other clips will be moved vertically.
-
Distribute Bottom – Utilizes the bottom pixels of each clip to create separation between clips. The highest and lowest positioned clips remain in their places, while all other selected clips move vertically.
-
Distribute Left – Creates an even separation between clips based on the pixels on the left side of the clip. The clips that are furthest to the left and furthest to the right stay at their current positions while all other clips are shifted horizontally to create an even separation between them.
-
Distribute Horizontally – Centrally positioned pixels are used to create spacing between selected clips. The clips that are furthest to the left and furthest to the right stay at their current positions while all other clips are shifted horizontally to create an even separation between them.
-
Distribute Right – Utilizes the pixels on the right side of the clips to space them evenly. The clips that are furthest to the left and furthest to the right stay at their current positions while all other clips are shifted horizontally to create an even separation between them.

