- for Windows
- for Mac
Filters and Overlays-filmora
With filters and overlays, your creative possibilities are endless. You can dramatically change the look and feel of your video in just a couple clicks.
- Add Filters/Overlays
- Remove Filters/Overlays
- Find Filters/Overlays
- Customize Filters
- Favorite Filters/Overlays
1. Add Filters/Overlays
Wondershare Filmora lets you add as many filters and overlays as you want.
There are three ways to add filters and overlays to a video.
- In the Media Library, click Effects, and then select the filters or overlays that you want to add to your project.

- Hover your mouse over the thumbnail of the effect you want to use. When you see a plus icon in the middle, click it. Then effect will be added to the timeline.
- Drag the filter/overlay and drop it directly onto the video clip in your timeline that you want to add it to. Effects will be applied to the whole video clip this way.
Note: If you are editing a ‘portrait’ (9:16) clip in a 16:9 video, you can add background blur filters to replace the black bars.
2. Remove Filters/Overlays
There are two ways to remove filters or overlays from your project.
- Select the filter/overlay in the timeline and hit Delete on your keyboard.
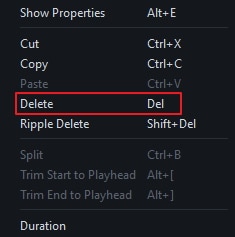
- Right click on the filter/overlay in the timeline and select Delete from the menu.

3. Find Filters/Overlays
All filters and overlays are sorted into themed categories (i.e. Faux Film or Bokeh Blurs) to make them easy to find. Go to the Effects menu and look to the left of the screen to see the categories and start browsing.
4. Customize Filters
Wondershare Filmora lets you change the duration or opacity of filter effects.
To change the duration
The default length is five seconds, but you can drag the edge of the effect in your timeline to change its duration.

To Change the Alpha Opacity of a Filter/Overlay
The alpha opacity (transparency) property can have a value of 0-100. A lower value makes the filter more transparent. Double click on the filter in the timeline to customize its opacity. Then, you preview how your clip looks with the filter applied to it in the Preview Window.

5. Favorite Filters/Overlays
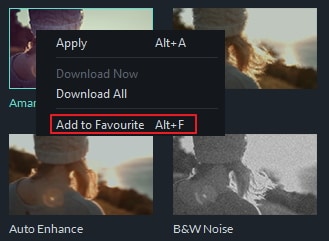
Right click on a filter effect in the Effects menu and select Add to Favorite. Then, go to the Favorite category to find it again quickly.
