

In today’s tutorial, we are going to show you how to quickly fix your clips using the Filmora9’s Stabilization, Lens Correction, Auto Enhance, Rotate, and Denoise features.
Video Stabilization
Some shots you record with your Smartphone or your action camera are not going to be perfectly still, but this doesn’t mean that you can’t still use them in the final cut of the video you are making in Filmora9.
In order to start stabilizing a shaky video, you just have to double-click on the video clip you placed on the timeline and head over to the Edit window on the left side of the screen.
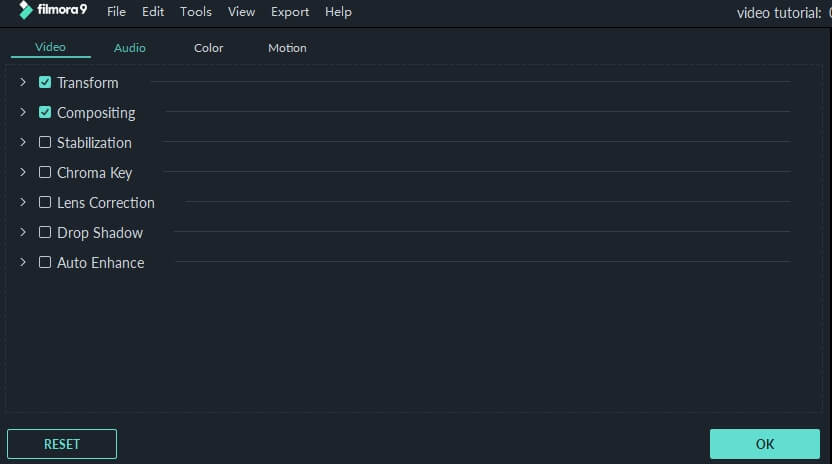
The Video tab contains several menus like Transform, Compositing or Chroma Key. Simply locate the Stabilization menu, extend it and click on the tick box next to it.
After you click on the checkbox, Filmora9 will start analyzing your footage, which means that the video editor is automatically going to detect parts of the shot that need to be stabilized.

After the analysis of the footage is completed, Filmora9 will slightly zoom in on your shot in order to remove artifacting problems that occur on the edges of the shot. The Smooth level slider enables you to choose how much you want to zoom in to remove all traces of artifacting.
Lens Correction
Videos recorded with wide-angle lenses can sometimes contain distortions. This issue frequently occurs in videos captured with action cameras that distort the edges of a shot.
Filmora9’s Lens Correction tool offers a quick solution to this problem. To access it, you just need to double click on a video clip that contains a lens distortion, after adding it to the timeline and go to the Edit window.
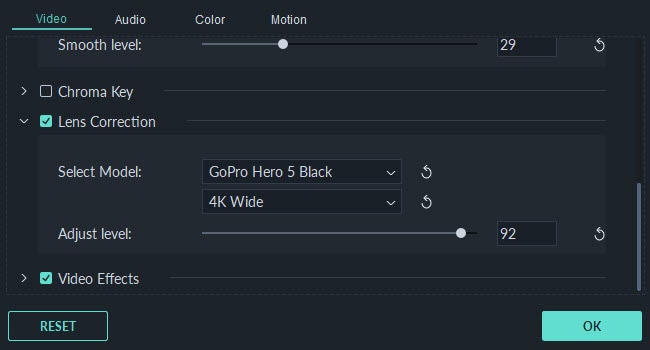
Locate the Lens Correction Menu, make sure that the checkbox next it is selected and proceed to pick the camera model on which the footage you’re editing was recorded from the Select Model drop-down menu.
The drop-down menu below lets you choose the same resolution as the one you used while shooting the video clip. When done, you can use the Adjust Level slider to perform the lens correction.
Auto Enhance
If you would like to improve a video’s contrast or make the colors more vivid and the image shaper, then you should try using the Auto Enhance option.
You can access this feature by navigating to the last menu in the Video tab that will appear on the screen as soon as you double-click on a video clip. After enabling the Auto Enhance option by clicking on the checkbox next to it, you can use the Amount slider to select the intensity of the effect.

Correcting Orientation

In case you recorded a horizontally oriented video with your phone, you can use Filmora9 to change a video’s orientation. Simply place a clip you’d like to rotate on the timeline, and double-click on it. Afterward, you should go to the Transform menu and use the Rotation and Scale sliders to fix a video’s orientation.
Denoise
Recording audio on outdoor locations can often be difficult, especially if don’t have access to professional audio recording equipment. Filmora9’s Denoise feature can reduce or eliminate entirely hissing, wind and humming sounds, but you should keep in mind that you can’t use the feature to remove voices.
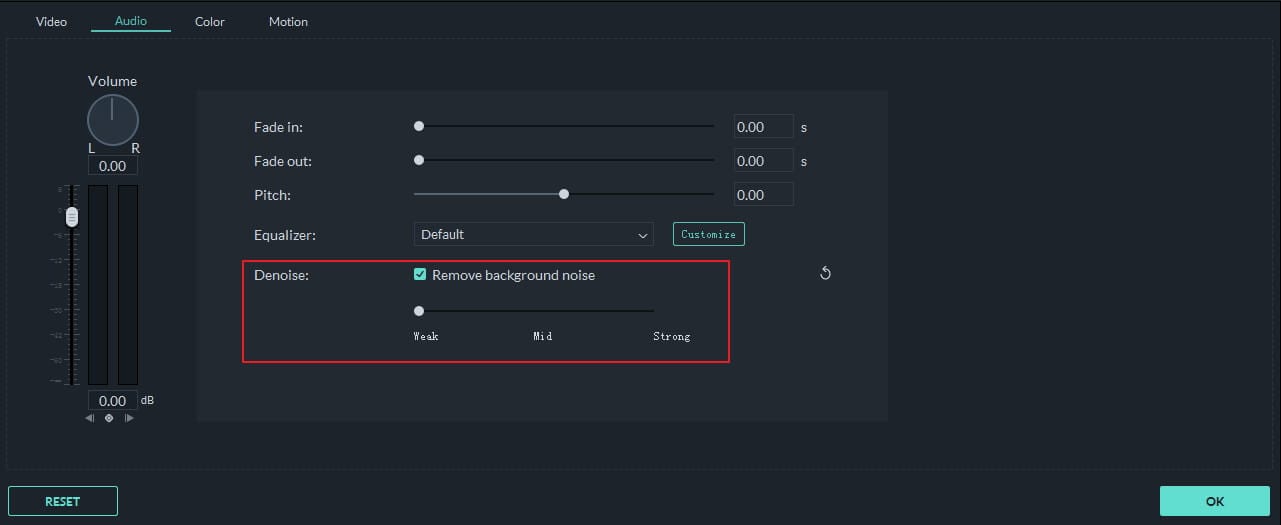
Once you place an audio file on the timeline you should double-click on it to bring up the Audio Editing tab. You’ll be able to see the Denoise feature near the bottom of the tab, so after you locate it, you just have to make sure that the Remove Background Noise option is enabled by clicking on the checkbox next to it.
The slider below let you set the intensity to Weak, Mid or Strong depending on how much noise you want to remove and Filmora9 will automatically reduce the level of background noise in your audio clip.