

In this tutorial, we will be learning about the options of FilmoraPro. This will help us personalize and experience FilmoraPro to get more optimized workflow out of it.
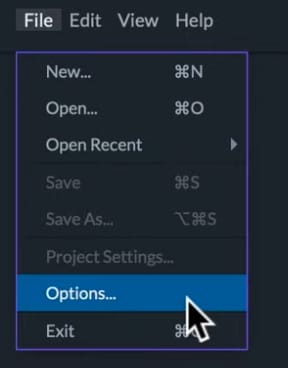
To access FilmoraPro’s preferences, go up to the Menu bar and click on the File > Options or you can use the hotkey Ctrl + comma.
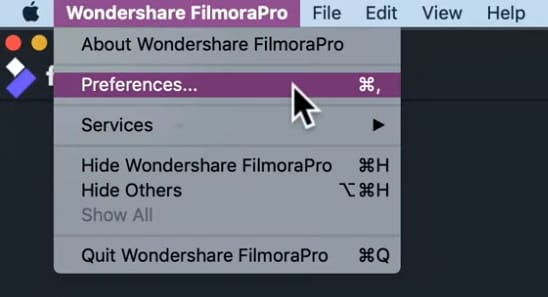
If you are using FilmoraPro on Mac, then you have to go up to the menu bar at the top of the screen and click Wondershare FilmoraPro preferences or you can use command + comma keys.
The Options window will open up. On the left side, we have 10 tabs and throughout this part, we will discuss a few of them.
General Tab
Maximum Undo: In the General tab, the first option you will see is the maximum undo option. It determines how many steps are taken in FilmoraPro that will be recorded for us to undo at any point. If you experiment a lot with your edits, then it’s great to have a larger number. Just keep in mind that a larger number of steps might affect the performance.
Default Template: The next option is the default template. It is the project settings that will be loaded when we create a new file. If we are doing a lot of videos with the same format, then it’s a good idea to sleet the right template here to speed up the process.
Plane/Image/Text Default Duration: When we drop a piece of media that doesn’t have time duration like in image, plane, or text by default, it will be imported as 150 frames long clip. Here we can change this default duration if we want to.
Timeline Default Duration: When we create a new project, the default duration on its settings will be of 5 minutes. We can set different default duration in this box. There are three ways we can display the audio waveforms and here we can choose between them. This will affect how we see them on the trimmer and timeline.
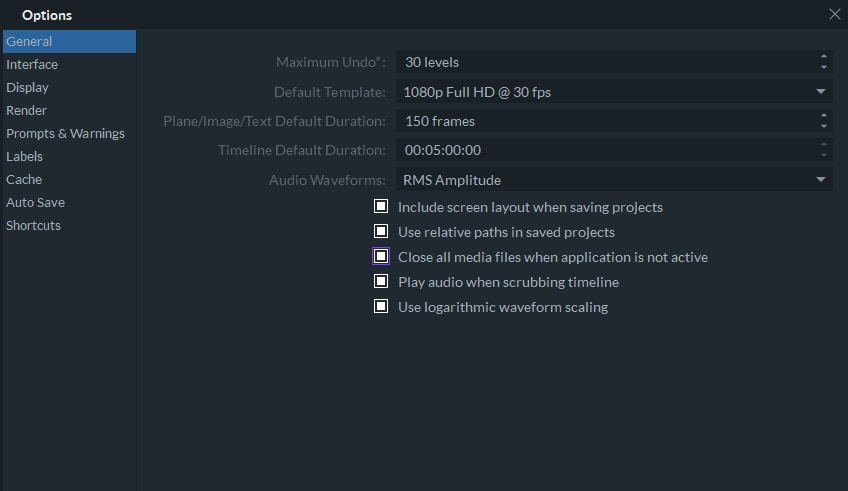
Audio Waveform: RMS amplitude will help us see small differences in the audio waveforms. The channel composite will show us the complete waveform with it’s up and down peaks. And the channel list option will show both the left and right channels if the audio clip is stereo.
Enabling the Include Screen Layout when saving Projects option down here will save your interface layout with the project file. When loading a project, the same layout becomes your workspace.
This next option Use Relative Paths in Saved Projects will change how FilmoraPro will search for and locate the files imported into the project.
When we open the project, by default FilmoraPro will use the absolute file path to find a file, e.g. user/tutorial/document. However, when we activate this option, FilmoraPro will use a relative path which means it will depend on where the project file is located. This option is great if we want to send a folder encompassing both the FilmoraPro project and the media files to be edited on another computer.
When we drag the playhead through the timeline or move frame to frame, the FilmoraPro will play a sound segment that is corresponding to that moment in time. We can deactivate this feature with the Play Audio when Scrubbing Timeline option.
This last option will affect how the audio waveforms appear on the timeline. If we use logarithmic waveform scaling, then we will have an easier time seeing a smaller piece.
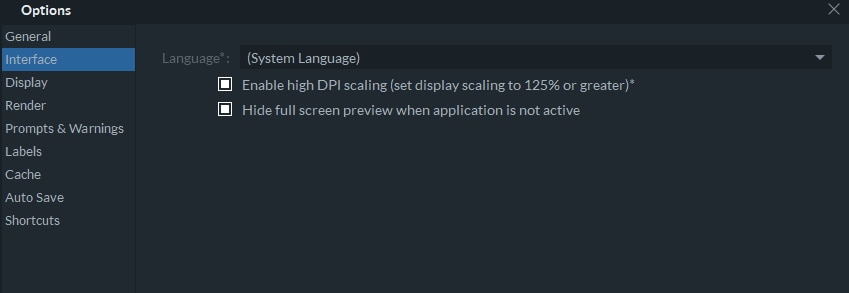
Interface Tab
Next, we have the interface tab. Here we can choose the language of FilmoraPro. If we choose system language, then FilmoraPro will use the language of our computer’s OS if it’s available. You can preview your footage in full-screen mode on the second display if you activate the Hide full-screen preview when the application is not active option.
If you are using FilmoraPro on Mac, the option to use the Native Menu bar will put the toolbar items of the FilmoraPro on the Mac OS top menu bar. Switching the Native Menu bar option off will move the menu items inside the FilmoraPro interface.
The settings marked with asterisk sign will take effect after restarting the FilmoraPro.
Display Tab
On the display tab, we can choose how the media panel and the editor panel will look by default. These options can also be changed for every project in the panel itself.
There will be several controllers on the viewer screen that will let us adjust settings or get certain information about our edits that are good to count on. But you might want to see the results of your edit without distractions that’s where these preferences come in handy.
The checkerboard background will be shown whenever there is transparency. We can turn it on or off with the Show Checkerboard Background option. The next option Show mouse coordinates can activate a display of the coordinates of the mouse in the corner of the viewer screen.
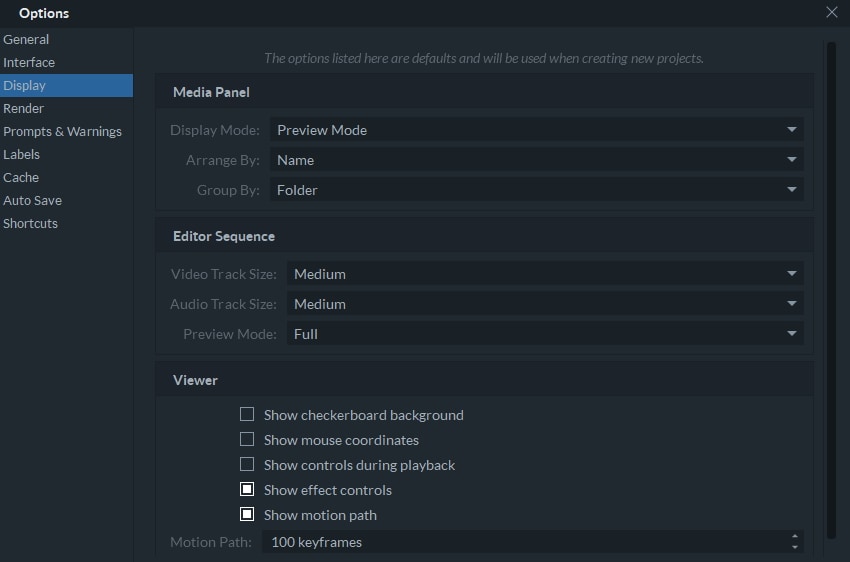
The on-screen controls by default will hide during the playback. On the next option Show controls during Playback you can choose to let them be visible. The next option Show Effect Controls will show or hide the options for adjusting the settings of each effect we apply.
When we animate the position of a piece of media in FilmoraPro, we will see a motion path in the viewer. Here, we can choose if we want to see the path or not and how many keyframes long we want to see our motion path for.
Once we’ve changed any settings we want to keep, we can confirm by clicking on Ok. Or we can restore the default values of each tab if we want.
So, that’s an in-depth look at how you can modify some of your preferences in FilmoraPro.