- for Windows
- for Mac
Trim/Split/Crop/Rotate/Join a clip-filmora
After your media files (videos, images, etc.) have been imported, it’s time to start editing in Filmora for Mac. This tutorial will go over arranging clips in your timeline, cleaning up your footage, editing out unwanted parts, and more.
- Add Media to the Timeline
- Deleting Media Files from the Timeline
- Trim Video Clips
- Split video Clip
- Rotate or flip a clip
- Crop Video clips
- Resize Videos
- Join videos
- Zoom in/out Timeline
1. Adding Media to the Timeline
There are two ways to add media from the Media Library to the timeline:
METHOD 1: Locate the file you want to add to the timeline, select it, and then drag and drop it where you want it on the timeline.
METHOD 2: Right-click on the clip you'd like to place on the timeline and then select one of the following options:

Insert: add your media to the selected track at the playhead. Any media that is already in the track on the right side of the inserted media will move to the right by the length of the inserted clip.
Overwrite: add your media to the selected track at the playhead, and replace any media already occupying the space your added media takes up.
Append: add your media as the last piece of media in the selected track.
Add to a new track: add your media to a newly created track which has no other media.
Note: You cannot add media to tracks with Track Lock enabled.
Accessing to Sample Colors and Sample Intro Videos

Filmora for Mac includes several sample colors (still images of color) and countdown intro videos. To access these resources, click Media and choose Sample Colors or Sample Video.
2. Deleting Media Files from the Timeline
Filmora for Mac offers a variety of ways to remove files from the timeline.
Probably the fastest way to remove a file from the timeline is to click on it, and then press the Delete button on your keyboard. Alternatively, you can select a file and then click on the Delete Icon on the toolbar.
Right-clicking on the clip in the timeline and selecting Delete from the menu is also an option.
If you'd like to delete multiple files from the timeline you can simply hold the Command key while selecting the files and then use any of the methods described above to remove them.
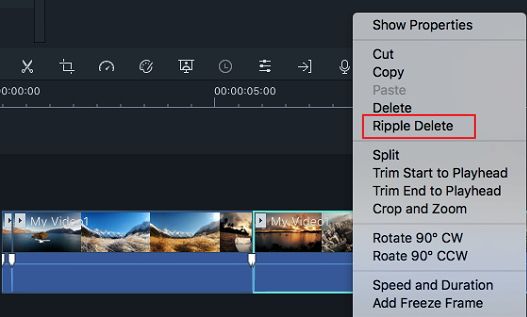
Ripple Delete
If you'd like to remove video clips from the timeline without creating large gaps in your video, use the Ripple Delete feature. Ripple Delete will close the gaps created by the clips you removed using clips that are already on the timeline.
Right-click on the clip you want to delete and select Ripple Delete. The software will close the gap left by the clip you removed by placing the two nearest clips next to each other.
3. Trim Video Clips
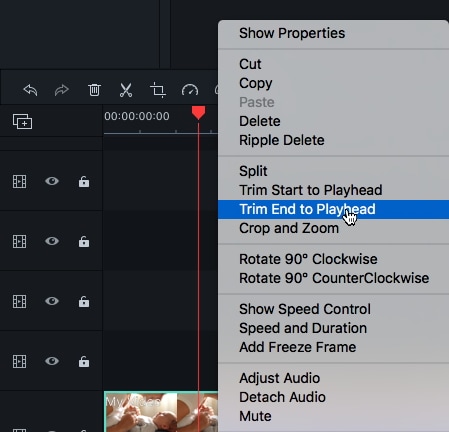
If you need to trim from the beginning or end of a video clip (or other pieces of media), hover your mouse over the left or right edge of the clip in your timeline until the trim tool ![]() appears. Then, click and drag the edge of your clip forwards or backwards to trim off the unwanted portion. You can also use the Trim Start to Playhead and Trim End to Playhead tools to quickly trim all the clips you're using in your project. Place the playhead at the exact frame where you want your video to start or end, and then right-click on it. Select either Trim Start to Playhead or Trim End to Playhead.
appears. Then, click and drag the edge of your clip forwards or backwards to trim off the unwanted portion. You can also use the Trim Start to Playhead and Trim End to Playhead tools to quickly trim all the clips you're using in your project. Place the playhead at the exact frame where you want your video to start or end, and then right-click on it. Select either Trim Start to Playhead or Trim End to Playhead.
If you need to cut out a section in the middle of a video clip, drag the playhead to the start point of the unwanted section and press the scissors icon to split the clip, then drag the playhead to the end of the unwanted section and press the scissors again. Now that the unwanted section is on its own you can select it and press the delete icon to remove it.
4.Split Video Clips
The split function helps you cut a video into two separate parts.
Filmora9 for Mac provides two ways to help you split a clip: on the Timeline or using the scene detection feature.
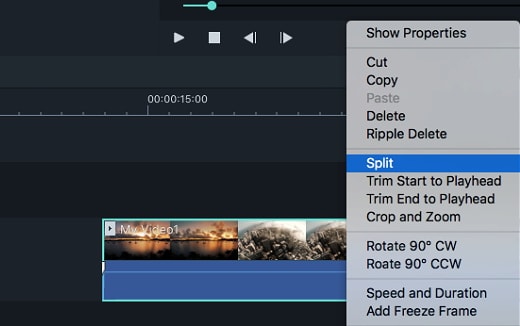
To split a clip directly on the Timeline
- Select a clip in the timeline.
- Place the playhead at the exact location in the clip where you want to make a split, and right click.
- A menu will appear on the screen; select the Split option. Alternatively, you can click on the icon that looks like scissors in the toolbar.
To split a clip using scene detection
If your clip contains several separate scenes or distinct shots, you can split it into separate clips using the Scene Detection tool.
- Right click on a video file in the Media Library and select "Scene Detection". This will open the Scene Detection window.
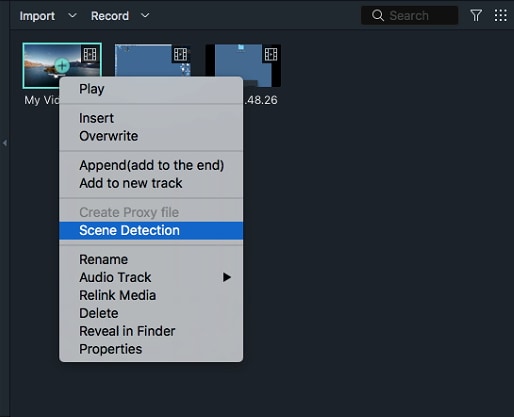
- In the Scene Detection window, click Detect. Your video will be broken down into several clips based on the transitions between scenes which Filmora9 was able to detect.
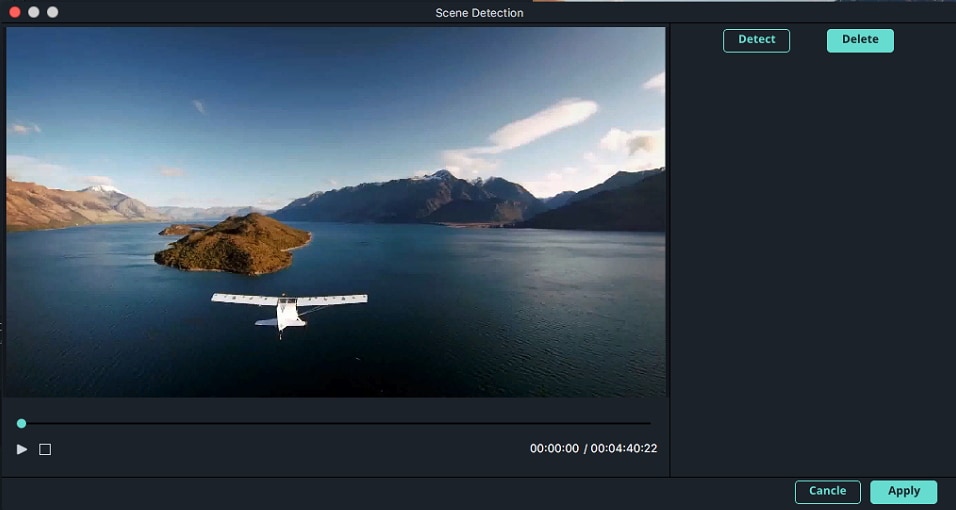
- Click the Apply button and the separated video clips that will be automatically added to the timeline.
5. Rotate or Flip a Video Clip
- To rotate or flip a clip: Place the clip you'd like to rotate or flip to the timeline and double click on it.
- The menu that opens will have options like Chroma Key and Composting. Go into the Transform menu and make sure its box is checked.

- Drag the Rotate Slider to the right to rotate your video, or insert a numerical value into the box located next to the slider.
- Directly below Rotate, you'll see the Flip option. The Horizontal Flip icon will let you reverse your clip from left to right, and the Vertical Flip icon will turn the clip upside down.
In the lower left corner of the menu, you'll see the Reset button. Click on it if you want to undo the changes you've made. If you’re happy with your changes, click OK.
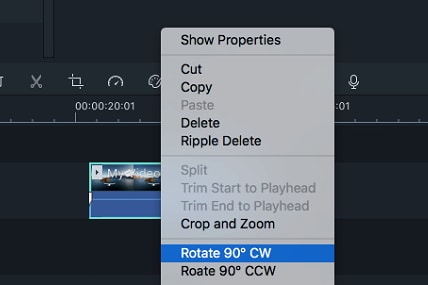
If you'd like to quickly rotate a video 90-degrees, right-click on it in the timeline and select Rotate 90 CW or Rotate 90 CCW.
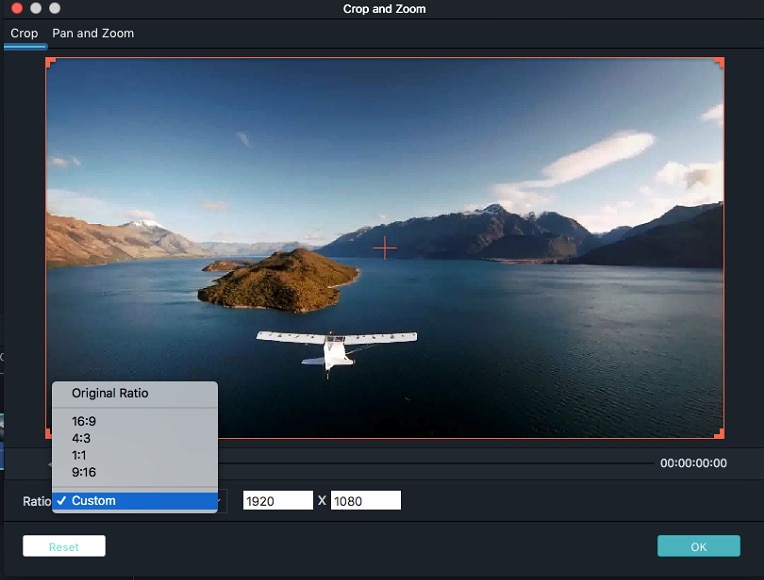
6. Crop Video Clips
Follow the steps below to crop out and zoom into sections of your video clips:
- Select the clip in the timeline.
- Right click on the clip and choose Crop and Zoom, or click the Crop icon
 .
. - In the popup window, move and adjust the rectangle to surround the area you want to crop. You can also choose the preset from the following preset dimensions: 16:9, 4:3, 1:1 or 9:16.
7.Resize Videos
To change the display size of a video, bring up the Video menu by double-clicking on the clip. Drag the Scale slider under Transform in the Video tab. Make sure the box next to Transform is checked first.
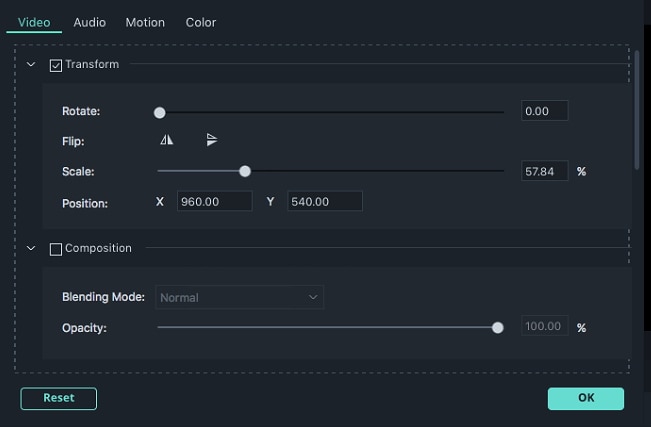
Next, to the Scale slider, you'll see a box where you can enter a specific value you want to scale to.
8.Join Videos
The join feature is for when you have several video clips in a sequence and want to combine them into one clip. To join videos clips, place them in the Timeline in the order you want them sequential order and export them as one video.
9.Zoom in/Zoom Out on the Timeline
To zoom in or out and see more or less (in more detail) of your timeline, use the zoom slider located in the upper right corner of the timeline. You can also click on the Plus icon  to zoom in or the Minus icon
  to zoom out.
Clicking on the Zoom to Fit icon  will zoom in or out however much is needed so that you can see your entire video.
You can also use keyboard shortcuts to change the zoom level: hold the Command key and press the + key to zoom in or the – key to zoom out.