- for Windows
- for Mac
Edit Action Camera Videos
Filmora for Mac provides a variety of practical features for editing action cam footage such as fisheye correction, video stabilization, speed controls, and color correction. Here’s how to:
- Fisheye Lens Correction
- Change Video Speed
- Make Freeze Frames
- Stabilize Shaky Footage
- Enhance Colors in Action Camera Videos
1.Fisheye Lens Correction
After you import a video clip into Filmora for Mac and place it on the timeline, double-click on it to bring up the Video editing panel. Locate Lens Correction and make sure that the checkbox next to it is marked.
In the Lens Correction menu, select your action camera model from the Select Profile drop-down menu and select the video resolution from the drop-down menu directly below it. Afterwards, the software will automatically perform the fisheye correction.

The Adjust Level slider can be used to fine tune the level of lens correction.Crag the slider to the right to increase the lens correction adjustment level and watch the Preview Window to see the results.
2.Changing Video Playback Speed
There are two ways to alter the playback speed of a video in Filmora.
1) Right click on the video clip you want to speed up or slow down and select the Speed and Duration.

In the window that appears on the screen you can drag the Speed slider left or right to change the speed of the video.

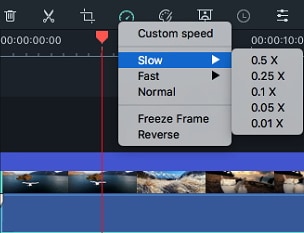
2) Select the action camera video in the timeline and click on the Speed icon ![]() in the toolbar. Use the Fast or Slow options in the drop-down menu to choose how much you want to speed up or slow down your video.
in the toolbar. Use the Fast or Slow options in the drop-down menu to choose how much you want to speed up or slow down your video.
3.Making Freeze Fames
Use the timeline zoom controls to magnify the timelin, so you can easily find the frame you'd like to freeze. Then, place the playhead at that location. Click on the Speed icon ![]() and select the Freeze Frame option from the drop-down menu.
and select the Freeze Frame option from the drop-down menu.

The default duration of a freeze frame is 5 seconds, but you can drag its edges in the timeline to change its duration. If you would like to change the default duration of all freeze frames, click on Wondershare Filmora and select Preference. In the window that opens go to the Editing tab and change the default duration of freeze frames.

4.Stabilize Shaky Footage
Action camera videos often contain v visible frame to frame jitters that can be distracting to viewers. Filmora's Stabilization feature can be used to significantly reduce the effects of camera shake, smoothing out your video and making it more pleasant to watch.
Double-click on a video clip in your timeline to bring up the Video editing panel and then go to the Stabilization menu. Make sure the box next to Stabilization is checked. In this menu, click the Analyze button.

After the analysis is computed, use the Smooth level slider to increase or decrease the level of stabilization. As you drag the slider you'll notice that the image will zoom in if you increase the smooth level and it will zoom out if you decrease it.
If the edges of your video appear flawed after the analysis, that is a normal part of the process. Increase the smooth level to zoom in past those edges.
5.Enhancing Colors in Action Camera Videos
To access the color correction tools in Filmora for Mac, double click on the footage in the timeline to open the video editing panel and then switch to the Color tab.

Alternatively, you can click on a video clip to select it and then click the Color Tuning icon on the toolbar to enter the Advanced Color Tuning window.

For more details please read Advanced Color Tuning and Enhancing video clips guides.