- for Windows
- for Mac
Enhance a Video in Wondershare Filmora for Mac
Wondershare Filmora for Mac has a variety of tools that can help you enhance the footage you’ve recorded. In this guide, you will learn:
- Enhance Video Color
- Speed Controls
- Make Freeze Frame
- Add Logo/Watermark to Video
- Take Snapshot from Video
- Control Video Playback Quality
- Preview Render
- Ripple Edit
- Grouping Clips
1. Enhance Video Color
Double-click on the video clip you'd like to enhance to bring up the Settings menu. Click into the Color tab, to access the color tuning tools.

You'll see White Balance, Tone, and 3D LUT sub-menus, each of which will have qualities like ‘temperature’ or ‘contrast’ which you can adjust by dragging the associated slider.
White Balance: you can adjust two settings in this menu: Temperature and Tint. Simply drag the slider in either direction, or enter a numerical value in the boxes located next to the sliders. The Select Color feature in the White Balance menu lets you choose a particular color to adjust.
Tone: modify Contrast, Saturation and Brightness by dragging the sliders associated with these qualities, or by entering numerical values in the boxes next to the sliders.
3D LUT: 3D LUTS are cinematic color settings that have been saved as presets. Use the dropdown menu in this section to see what your clip looks like with different 3D LUTs.
All changes you make will be visible in the Preview Window, as long as the box next to the submenu you are using is checked. If you want to undo all your changes you can click on the Reset button. If you’re happy with your changes, click OK to apply them.
Click the Color Tuning icon in the toolbar to open the Advanced Color Tuning window, which provides more color correction tools. Alternatively, you can access the Advanced Color Tuning window by right-clicking on a clip and selecting Color Correction.

In the Advanced Color Tuning window, you'll be able to adjust White Balance, Color, Light, or HSL settings or even add 3D LUTs and Vignettes. If you would like to use a particular set of adjustments again, click on the Save as Preset button to save your changes as a new preset, which you can access in the Preset tab.
The Preset tab has a number of color editing presets for you to choose from.
Click OK to apply your adjustments to your video.
For more detailed information about Advanced Color Tuning, check out the Color Tuning guide.
2. Speed Controls
There are lots of ways you can use slow and fast motion to maximize the impact of your videos. There are two different ways you can change your video’s speed in Filmora for Mac.
Method 1: right-click on a clip in the timeline and select Speed and Duration. The Custom Speed window will pop up. Drag the speed slider to make your video faster or slower.

Next to the speed slider, you'll see a speed box where you can type in a precise speed value. You make your clips up to 100 times faster or 0.01 times slower.
Method 2: select your clip in the timeline and click on the Speed Icon ![]() in the toolbar. Select Custom Speed, Slow, or Fast from the dropdown menu.
in the toolbar. Select Custom Speed, Slow, or Fast from the dropdown menu.
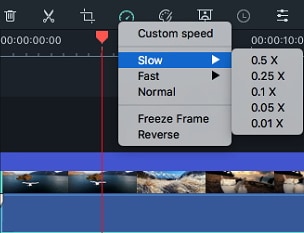
You can quickly slow down a video by 0.5X, 0.25x, 0.1x, 0.05x, or 0.01x, or you can speed it up by 4x, 8x, 20x, 50x, or 100x.
3. Make a Freeze Frame
In Filmora for Mac you can create a freeze frame from the timeline by placing the playhead at the frame you want to freeze, click the Speed icon, and choosing Freeze Frame from the dropdown menu.

You can alter the duration of a freeze frame on the timeline by dragging one of its ends. Or, you can go to Preferences under the Wondershare Filmora menu and switch to Editing tab.

There, you’ll find the Freeze Duration option and be able to insert the preferred new duration.

4. Add Watermarks and Logos to Videos
After importing a video clip and watermark/logo image to the Media Library, drag and drop the video clip to a video track (i.e. Track 1) and the watermark/logo to a track above it. You can drag the watermark/logo image in the Preview Window to move it to where you want it. To adjust the size of the watermark or logo, drag the small circles and squares at its edges in the Preview window.
To adjust the opacity or blending mode of your watermark or logo (i.e. make it transparent), double-click the logo image in the timeline to open the Image panel and go to Composition. From there you can choose a composition mode (i.e. darken) and use the Opacity slider to adjust your transparency.
![]()
5. Take a snapshot from a video clip
To take a snapshot of a video clip and save it as an image file, play the video and pause it where you want to take the snapshot. Then, click the Snapshot button  below Preview. The snapshot will automatically be added to the Media Library and saved to your computer.
Note: To take a snapshot and maintain the original quality, please follow the steps below:
- Import the video clip to the Media Library.
- Select the video in the Media Library so you can see it in the preview window.
- Play the video and click the snapshot icon at the desired frame.
If you drag and drop the video into the timeline first and then take a snapshot, the image quality will be reduced.
6. Control Playback Quality
You can adjust the playback quality of the Preview window for a smoother editing experience. For example, you can improve the performance of your preview by playing your video at a lower resolution than you want for your finished project or by creating proxy media files to edit with.
Proxy files are more manageable versions of your clips that are easier to edit with because they are smaller in terms of data (i.e. they are at a lower resolution). You can edit with a proxy file in Filmora, then export with your full-sized original clip.
To reduce your playback quality, click the Display icon under the video preview and choose a new setting from half to 1/16th quality.

Changing the playback quality won't affect the quality of your exported video or the size of the file you export.
7. Preview Render
After you add the footage you want to include in the video you’re creating a red line that is going to be displayed above the timeline indicating that the footage should be rendered in order to ensure the smooth playback.

Manual Render Option
Click on the Render Button to initiate the rendering process. The progress window will pop up on the screen showing who many frames have been rendered and the approximate duration of the process. You are not going to be able to perform any video editing tasks while the video clips are being rendered. The red line above the timeline will turn green as soon as the rendering of the files you added to the timeline is completed.

Auto-Render Feature
Besides enabling you to render the footage manually, Filmora for Mac also allows you to perform this action automatically. In order to activate this feature, go to Wondershare Filmora, and select the Preferences option. The Preferences window that contains several tabs will appear on the screen. In the Performance tab, you’ll be able to find the Preview Render menu that offers a number of rendering options.
Click on the Background Render checkbox and proceed to select the period of time when automatic render will begin after importing. Optionally, you can specify the folder in which all of the preview render files are going to be saved, before clicking on the OK button to confirm the changes you’ve made. Once the Background Render feature is enabled, all files you add to the timeline will be rendered automatically without disrupting the video editing process.

A green line will be displayed over the rendered portion of the timeline, while the red line is going to appear over all segments of the timeline that aren’t yet rendered. In case you add a visual effect or any other asset to the rendered part of the timeline, the green line will turn red indicating that you must render that segment of the timeline again.
8. Ripple Edit
Empty gaps between clips may cause unwanted mistakes in the final cut of the video. The Auto Ripple button offers a simple solution to this problem because it removes all gaps between clips and makes the process of trimming, cutting or deleting the footage much easier. Moreover, if you decide to add a new video clip to the middle of the timeline, all of the video clips and visual effects will be moved to the right to make space for the new video clip. To switch the Auto Ripple option on, you just have to click on its icon in the upper left corner of the timeline.

When Auto Ripple Edit is on, you can delete clips on the timeline without affecting the orders of other elements on other tracks.

Delete clip while the Auto Ripple option is enabled
9. Grouping Clips
With grouping, you can link clips so that they can be moved and edited together.
To create a group of clips, hold down the Command key on your keyboard and select the clips you want to add to a group in the timeline. When that’s done, right-click one of the clips and select Group.
To ungroup your clips for individual editing, right-click on one of them in the timeline and choose Ungroup.